Render tutorial: Rendering with HDRI - Brazil
Posted by zeppelin101
| Registered: 18 years ago |
Right, this guide is for absolute beginners ") But you can skip down if there is something you are unsure of
But you can skip down if there is something you are unsure of ")
First thing to do is to set up your shape and textures for rendering. Ideally, you want lod_0 and al hi-res textures. Open up your lod_0 with 3d editor, and then save it; this will unlock the .gp4 file for use with ZM. In Photoshop (or equivalent), flip the textures vertically, and save them as a 32-bit file (or as .bmp if you're feeling generous with your hard disk space). You may need to rename the textures if the names are more than 8 letters.
ZM
Import your shape into ZM. Then go to material editor (the red sphere at the top of the toolbar) and add / replace your textures. If you are using a helmet for your render, we'll sort that out later. Select all car objects and with SEL activated (space bar) go to create > objects > unite select, and name it "car1".
Next, import a tyre and rim set for your car. There are a few about, you'll just have to do a bit of searching. Once you are sure that they're in the perfect position, select the car and tires, and merge them naming it "car".
With a helmet, do the same as you did with the shape, and rename your textures to 1_1 and 1_2, also removing alpha layers on both textures. Then merge the two helmet parts into one object. Don't merge it with the car, so you can move it around later in 3ds.
Export it to .3ds format and wait for it to save.
3ds max
Import your .3ds file, then press "m" to open material editor, and click the eyedropper tool beside the name box, and click on the car. This is the "pick material from object" button, and it loads your textures for you from the car. Do the same for the helmet in the next slot. Make another material for your ground plane in the next slot. Make it a brazil basic, and only add a reflection map (Falloff > Fresnel). Change the diffuse colour to a grey, or white depending on your car colours (see environment section).
Change the car textures to Brazil Basic Material, add your diffuse map from where it is saved and in the bitmap parameters, look for the checkbox which says "None (Opaque). This basically disabled the alpha layer if you are rendering with tga's. You won't need to worry if you are using .bmp's. You will then need to add a reflection map. This is the best place to experiment later on. Select a falloff reflection map, and then change the perpendicular setting to fresnel. Experiment with the Refractive index modifier to change how the car reflects the lights. Do the same for the helmet textures.
Create a box over the car (dimensions don't matter) and move it so it sits just above the car. Go to properties (right click) and then deselect "visible to camera" and "receive / cast shadows". Then go back to material editor and in a fourth slot, select Brazil Utility. Go to colour and change that map to "Output" and change the RBG Output to 3. Assign this to your box (the cube with an arrow pointing at it below the spheres).
Then go to environment, press 8, and change the colour according to what colours are on the car. If there is white, use a grey, otherwise, you should use a white colour.
Then go to the render settings. Here, change render size to 800*600 (for test purposes). Make sure you have Brazil selected as your default renderer at this points. Go to the settings tab, and go to image filtering. Change this to P3 for the best results. Then go to Brazil Luma server, and activate the global skylight. Change the colour to white. Experiment with the GI value (1.3 is a good value for lighting). Finally, go to the CSG server and add your material for your ground plane to it. This will enable a ground reflection for your car. Now you can make a test render. Tweak values until it looks how you want it to, and then make it the size you actually want it to be in the end
Edited 3 time(s). Last edit at 06/25/2006 11:56PM by zeppelin101.
But you can skip down if there is something you are unsure of First thing to do is to set up your shape and textures for rendering. Ideally, you want lod_0 and al hi-res textures. Open up your lod_0 with 3d editor, and then save it; this will unlock the .gp4 file for use with ZM. In Photoshop (or equivalent), flip the textures vertically, and save them as a 32-bit file (or as .bmp if you're feeling generous with your hard disk space). You may need to rename the textures if the names are more than 8 letters.
ZM
Import your shape into ZM. Then go to material editor (the red sphere at the top of the toolbar) and add / replace your textures. If you are using a helmet for your render, we'll sort that out later. Select all car objects and with SEL activated (space bar) go to create > objects > unite select, and name it "car1".
Next, import a tyre and rim set for your car. There are a few about, you'll just have to do a bit of searching. Once you are sure that they're in the perfect position, select the car and tires, and merge them naming it "car".
With a helmet, do the same as you did with the shape, and rename your textures to 1_1 and 1_2, also removing alpha layers on both textures. Then merge the two helmet parts into one object. Don't merge it with the car, so you can move it around later in 3ds.
Export it to .3ds format and wait for it to save.
3ds max
Import your .3ds file, then press "m" to open material editor, and click the eyedropper tool beside the name box, and click on the car. This is the "pick material from object" button, and it loads your textures for you from the car. Do the same for the helmet in the next slot. Make another material for your ground plane in the next slot. Make it a brazil basic, and only add a reflection map (Falloff > Fresnel). Change the diffuse colour to a grey, or white depending on your car colours (see environment section).
Change the car textures to Brazil Basic Material, add your diffuse map from where it is saved and in the bitmap parameters, look for the checkbox which says "None (Opaque). This basically disabled the alpha layer if you are rendering with tga's. You won't need to worry if you are using .bmp's. You will then need to add a reflection map. This is the best place to experiment later on. Select a falloff reflection map, and then change the perpendicular setting to fresnel. Experiment with the Refractive index modifier to change how the car reflects the lights. Do the same for the helmet textures.
Create a box over the car (dimensions don't matter) and move it so it sits just above the car. Go to properties (right click) and then deselect "visible to camera" and "receive / cast shadows". Then go back to material editor and in a fourth slot, select Brazil Utility. Go to colour and change that map to "Output" and change the RBG Output to 3. Assign this to your box (the cube with an arrow pointing at it below the spheres).
Then go to environment, press 8, and change the colour according to what colours are on the car. If there is white, use a grey, otherwise, you should use a white colour.
Then go to the render settings. Here, change render size to 800*600 (for test purposes). Make sure you have Brazil selected as your default renderer at this points. Go to the settings tab, and go to image filtering. Change this to P3 for the best results. Then go to Brazil Luma server, and activate the global skylight. Change the colour to white. Experiment with the GI value (1.3 is a good value for lighting). Finally, go to the CSG server and add your material for your ground plane to it. This will enable a ground reflection for your car. Now you can make a test render. Tweak values until it looks how you want it to, and then make it the size you actually want it to be in the end
Edited 3 time(s). Last edit at 06/25/2006 11:56PM by zeppelin101.
| Moderator Registered: 20 years ago |
Linked to the GP4FAQ sticky. Thanks, nice work
[www.mediafire.com] Some say you should click it, you know you want to. [www.gp4central.com] <----GP4 Central
[www.mediafire.com] Some say you should click it, you know you want to.
[www.gp4central.com] <----GP4 Central| Registered: 20 years ago |

| Registered: 18 years ago |
Hey! I know how to make a render, with the default renderer. But, when I use Brazil Plug-In, I don't know how to make a good render as the others... Would you mind to explain it with some images to make it simply? Or just explain things with more details...
Thanks people!!
raulgullon.com -
Wedding and Motorsports Photography.
Thanks people!!
raulgullon.com -
Wedding and Motorsports Photography.
| Registered: 18 years ago |
| Registered: 18 years ago |
Zep, always perfect and always a good friend.
Here it has some tutorial of others plugins but this tutorial one that the Zep indicates is best is faster also easy e to memorize to illuminate a scene.
[www.evermotion.org]
Information: VRay is one plugin that it has one to relieve more "refined and slow" for a more realistic scene.
My exemple.

Edited 1 time(s). Last edit at 05/08/2006 04:19PM by Jorpaes.
Here it has some tutorial of others plugins but this tutorial one that the Zep indicates is best is faster also easy e to memorize to illuminate a scene.
[www.evermotion.org]
Information: VRay is one plugin that it has one to relieve more "refined and slow" for a more realistic scene.
My exemple.
Edited 1 time(s). Last edit at 05/08/2006 04:19PM by Jorpaes.
| Registered: 18 years ago |
| Registered: 18 years ago |
| Registered: 18 years ago |
Well, you are using the wrong material for starters. Use Brazil Advanced and choose car paint shader from the list. You'll have to apply the same texture to three different slots : Difuse, falloff and candy. Reflection color must be white and put a reflection amount of 1.8.
For image filter you want to use Catmull-Rom for best sharp results.
In the skylight properties, make sure to turn off default lights and leave the values on default which is -3 and 0 if I'm not mistaken. Or 0 and -3. Default as I said. To increase quality you have to change the view rate and sec rate values. Default is 15 and 5, increase to 25 and 20. Increase until you get smooth shadows from the renders.
As for reflections, ideally you want to use a HDRI map in the enviroment slot of you scene instead of using white boards. Effect is not the same.
IMO, Brazil produces quality results a lot faster then Vray. Skylight in Vray is messy and you never get the same result from one render to another even if you don't change values. What Vray excels in is interior shots for architectual visualization, but you are not doing that, eh?")
For image filter you want to use Catmull-Rom for best sharp results.
In the skylight properties, make sure to turn off default lights and leave the values on default which is -3 and 0 if I'm not mistaken. Or 0 and -3. Default as I said. To increase quality you have to change the view rate and sec rate values. Default is 15 and 5, increase to 25 and 20. Increase until you get smooth shadows from the renders.
As for reflections, ideally you want to use a HDRI map in the enviroment slot of you scene instead of using white boards. Effect is not the same.
IMO, Brazil produces quality results a lot faster then Vray. Skylight in Vray is messy and you never get the same result from one render to another even if you don't change values. What Vray excels in is interior shots for architectual visualization, but you are not doing that, eh?
| Registered: 18 years ago |
Bleh, I've seen excellent vray renders for vehicles inc HDRI.
I don't use HDRI with brazil cos the renders I do anyway just take 10 mins plus cos my PC sucks as it is. And since it shows up in the background (unless this can be disabled?), you don't get the chance to do particularly wide shots for side views.
Brazil Basic is good for starters, it gets results, and it doesn't look that bad, and it turns out better for textures in my opinion. The advanced material just requires loads of messin about to get results, unfortunately, I don't have the time to play around with it at the moment. Exams pretty soon
| Registered: 18 years ago |
>>Bleh, I've seen excellent vray renders for vehicles inc HDRI.
Of course you have. All renderers are capable of pretty much the same. It doesn't mean Vray doesn't have problems though.
>>I don't use HDRI with brazil cos the renders I do anyway just take 10 mins plus
>>cos my PC sucks as it is. And since it shows up in the background (unless this
>>can be disabled?), you don't get the chance to do particularly wide shots for
>>side views
HDRI shouldn't take longer to render. And yes, you can disable it so that it won't show up in the background. Just use pass control and set background color to Black (Or whatever you want)
>>Brazil Basic is good for starters, it gets results, and it doesn't look that
>>bad, and it turns out better for textures in my opinion. The advanced material
>>just requires loads of messin about to get results, unfortunately, I don't have
>>the time to play around with it at the moment. Exams pretty soon
Brazil basic is an old and slow shader that is still there just because of the older versions of brazil that didn't have the advanced shader, for compatibility reasons. Brazil 2.0 won't have it anymore. Brazil advanced is faster, more powerfull and handles textures better. If you follow up my previous description you'll have a better material then you currently use without having to mess with anything
| Registered: 18 years ago |
| Registered: 18 years ago |
| Registered: 18 years ago |
Joe_Satriani Wrote:
-------------------------------------------------------
> Brazil basic is an old and slow shader that is
> still there just because of the older versions of
> brazil that didn't have the advanced shader, for
> compatibility reasons. Brazil 2.0 won't have it
> anymore. Brazil advanced is faster, more powerfull
> and handles textures better. If you follow up my
> previous description you'll have a better material
> then you currently use without having to mess with
> anything
My point was that it's similar to a raytrace material, which I actually have some knowledge of
Being virtually self taught (and loads of tutorials still suggest using the basic material), I didn't know what the hell I was doing with the Advanced material, so I gave up on it
| Registered: 18 years ago |
Well after some experiments with Brazil Advanced and HDRI, I thought I'd share the best way to go about making a render with it for those of you who want to try.
First thing you'll need to do is to update all your materials to Brazil Advanced, and change the Base Shader to Car Paint. You'll have to reload the textures to do this. Do them one a time, and once you've added your texture to the color slot, drag it down to Candy, and Falloff as well. You may need to change the colour of the Candy and Color settings if your texture is white, as it seems that the colour affects the brightness, and in the case of the Candy colour, the Pink bleeds through the texture. I recommend a mid-grey, that should give you a good trade-off between brightness and contrast.
If you are using a model from my previous tutorial, and have a white box over the car, delete this, as it will just increase rendering time and will make the render look pants
For the reflections, change the Reflect colour to white, and change the IOR to 2. If you want to change how reflective it is, change the IOR number. If you're just experimenting with normal primitives (sphere's, torus knots etc) then here's what approximate IOR values are equivalent to:
IOR = 20: Chrome
IOR = 10-15: Brushed Metal (gold etc)
IOR = 5-10: Car paint (no textures)
IOR = 2-5: Car paint (textures)
IOR = >2: Glass / low reflectivity objects
For tires, keep the Base shader as Brazil Default. Then change the reflect colour to a very dull black (HSV 35-45). Then go to Advanced Reflection Params and activate Glossiness, and tune it down to roughly 20. This will blur the reflection, and make it seem more tire-like, as it won't be reflecting specific details of the HDRI used in the reflection.
Once you've done this for all your textures, you can go about setting up you HDRI. To do this, pick an empty slot, and click "Get Material" (the blue sphere with an arrow pointing to it). Then select Bitmap, and your HDR image. Take careful note of what the white point value is, as you will need to put this into the RGB level slot in the Bitmap Output Params. For example, if it's 20, you scroll down to Output at the bottom of the screen, and type 20 into the RGB level box, this will make your HDR image the correct brightness / contrast for best results. Higher than the white point value will make your reflections very bright, and perhaps overwhelm the textures if it's too bright. If it's below the white point, it will reflect with very little "punctuation" to the reflection. Now open up the evironment menu (keep the material editor open) and drag your HDRI map into the map slot. In the Co-ordinates rollout, change the mapping type to "Environ" and then in the box, cylindrical, or spherical mapping. Different maps are made for different Environ maps, so experiment for best results.
Next, we need to set up Brazil for some better results. Recently, I've been playing around with getting better looking shadows. The best technique I've found so far, is to have a Brazil directional light, Shadows on, and then with the specular surface settings turned off, and the diffuse as close to 0 as possible. When shadows are turned off in the Skylight settings, this seems to give a better result with shadows.
Go to the Luma Server and uncheck the "Allow Default Lights" and "Enable Shadows" box. Then, where it says View Rate and Sec, change these to 25 and 20 respectively. Then go to the Image Filter Rollout and change it to Catmull-Rom, this is a sharper filter than the one that Brazil uses as default, and it produces (imo) the best results, having experimented with all of them.
Another thing to do (if you have a white scene) is to go to Render Pass Control, and turn it on. Then go to environment settings, and change it to White. This will mean that your HDRI map does not show up in wide-angle shots, or shots where it is likely the map will be shown. If you are doing a scene with asphalt or something else, then experiment in Photoshop / PSP / Gimp with the background to try and get the best results.
I'll upload pics and find some links to a few free HDRI images. You'll also need a little tool called HDR shop, which lets you edit HDRI images in an image editor, and means you can change the resolution of the maps in order to speed up the render, or to get better results with an ultra hi-res map.
Another technique with HDRI is HDR lighting. This involves putting the map you added to the environment slot into the Skylight as well. It is designed to simulate real world lighting, and depending on the map used, will change the colours in the render depending on what range of colours used in the map. For example, a bright, "hot" map (ie, a map which is predominantly red / orange / yellow etc "hot colours" will give the render a hue to match. The opposite would happen if you had a map that was predominantly "cold" colours.
One thing to bear in mind when experimenting with HDRI lighting, is that it will increase rendering times. In my case, it increase them pretty dramatically because I have a poor PC, but in any case, rendering times will increase. Another thing to bear in mind is that you'll have to tone down your skylight value, otherwise the render will be too bright and will look washed out. Experiment with values, it changes from map to map, and while a value of say, 0.5 will work for one, it might be too dark for another map
When I get home, I'll update with a few pics and links, for now though, enjoy HDRI
-EDIT- [www.lightworks-user.com] Click on Image Files and download the panorama's imo, they work best with cylindrical mapping
And HDR Shop: [gl.ict.usc.edu]
Edited 2 time(s). Last edit at 05/18/2006 11:46AM by zeppelin101.
First thing you'll need to do is to update all your materials to Brazil Advanced, and change the Base Shader to Car Paint. You'll have to reload the textures to do this. Do them one a time, and once you've added your texture to the color slot, drag it down to Candy, and Falloff as well. You may need to change the colour of the Candy and Color settings if your texture is white, as it seems that the colour affects the brightness, and in the case of the Candy colour, the Pink bleeds through the texture. I recommend a mid-grey, that should give you a good trade-off between brightness and contrast.
If you are using a model from my previous tutorial, and have a white box over the car, delete this, as it will just increase rendering time and will make the render look pants
For the reflections, change the Reflect colour to white, and change the IOR to 2. If you want to change how reflective it is, change the IOR number. If you're just experimenting with normal primitives (sphere's, torus knots etc) then here's what approximate IOR values are equivalent to:
IOR = 20: Chrome
IOR = 10-15: Brushed Metal (gold etc)
IOR = 5-10: Car paint (no textures)
IOR = 2-5: Car paint (textures)
IOR = >2: Glass / low reflectivity objects
For tires, keep the Base shader as Brazil Default. Then change the reflect colour to a very dull black (HSV 35-45). Then go to Advanced Reflection Params and activate Glossiness, and tune it down to roughly 20. This will blur the reflection, and make it seem more tire-like, as it won't be reflecting specific details of the HDRI used in the reflection.
Once you've done this for all your textures, you can go about setting up you HDRI. To do this, pick an empty slot, and click "Get Material" (the blue sphere with an arrow pointing to it). Then select Bitmap, and your HDR image. Take careful note of what the white point value is, as you will need to put this into the RGB level slot in the Bitmap Output Params. For example, if it's 20, you scroll down to Output at the bottom of the screen, and type 20 into the RGB level box, this will make your HDR image the correct brightness / contrast for best results. Higher than the white point value will make your reflections very bright, and perhaps overwhelm the textures if it's too bright. If it's below the white point, it will reflect with very little "punctuation" to the reflection. Now open up the evironment menu (keep the material editor open) and drag your HDRI map into the map slot. In the Co-ordinates rollout, change the mapping type to "Environ" and then in the box, cylindrical, or spherical mapping. Different maps are made for different Environ maps, so experiment for best results.
Next, we need to set up Brazil for some better results. Recently, I've been playing around with getting better looking shadows. The best technique I've found so far, is to have a Brazil directional light, Shadows on, and then with the specular surface settings turned off, and the diffuse as close to 0 as possible. When shadows are turned off in the Skylight settings, this seems to give a better result with shadows.
Go to the Luma Server and uncheck the "Allow Default Lights" and "Enable Shadows" box. Then, where it says View Rate and Sec, change these to 25 and 20 respectively. Then go to the Image Filter Rollout and change it to Catmull-Rom, this is a sharper filter than the one that Brazil uses as default, and it produces (imo) the best results, having experimented with all of them.
Another thing to do (if you have a white scene) is to go to Render Pass Control, and turn it on. Then go to environment settings, and change it to White. This will mean that your HDRI map does not show up in wide-angle shots, or shots where it is likely the map will be shown. If you are doing a scene with asphalt or something else, then experiment in Photoshop / PSP / Gimp with the background to try and get the best results.
I'll upload pics and find some links to a few free HDRI images. You'll also need a little tool called HDR shop, which lets you edit HDRI images in an image editor, and means you can change the resolution of the maps in order to speed up the render, or to get better results with an ultra hi-res map.
Another technique with HDRI is HDR lighting. This involves putting the map you added to the environment slot into the Skylight as well. It is designed to simulate real world lighting, and depending on the map used, will change the colours in the render depending on what range of colours used in the map. For example, a bright, "hot" map (ie, a map which is predominantly red / orange / yellow etc "hot colours"
will give the render a hue to match. The opposite would happen if you had a map that was predominantly "cold" colours.One thing to bear in mind when experimenting with HDRI lighting, is that it will increase rendering times. In my case, it increase them pretty dramatically because I have a poor PC, but in any case, rendering times will increase. Another thing to bear in mind is that you'll have to tone down your skylight value, otherwise the render will be too bright and will look washed out. Experiment with values, it changes from map to map, and while a value of say, 0.5 will work for one, it might be too dark for another map
When I get home, I'll update with a few pics and links, for now though, enjoy HDRI
-EDIT- [www.lightworks-user.com] Click on Image Files and download the panorama's imo, they work best with cylindrical mapping
And HDR Shop: [gl.ict.usc.edu]
Edited 2 time(s). Last edit at 05/18/2006 11:46AM by zeppelin101.
| Registered: 18 years ago |
Hi,
thanks for the Tutorial.
Can somebody be so kind a make a tutorial to render for an free programm like K-3D or Open-FX? I didnt find a good Link for that, and explinations in english are not always easy to understand even thpugh my english is not that worse. (Maybe in german language)
I have to say, that im a total noob in graphics design, rendering and so on, but i want to learn some things, so i can make my contribution to the community.
Thanks
mick
| Registered: 19 years ago |

| Registered: 20 years ago |
Nicely done Zep and Joe. I have one addition: When using textures on the car paint shader, set flakes amount to 0 to avoid ugly stains.
Here's some interesting links:
[www.carbodydesign.com]
[www.debevec.org] (scroll down)

[1991] [2003] [2004] [gp2 world series]
Here's some interesting links:
[www.carbodydesign.com]
[www.debevec.org] (scroll down)
[1991] [2003] [2004] [gp2 world series]
| Registered: 18 years ago |
Re: Render tutorial: Rendering with HDRI - Brazil Date: August 26, 2006 12:47PM Posted by: welshjim22 | Registered: 18 years ago |
Can anyone help. I have only just started to get involved in making stuff and at present only for my use. However, i am trying to make a fanatsy Welsh F1 car based on INtwebs Fw27 template. I have been using Zmodeler but wish to make renders as i progress. I have the trial download of 3ds max 7 but whilst i can import the car i can't import the textures. I have exported the car in Zmodeler into a .3ds file which 3ds imports fine except i lose all textures.
Can someone explain where i am going wrong or is there easier free software.
Thanks
James

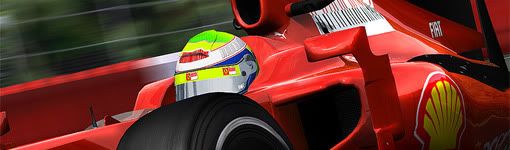
Helmet Courtesy of Dangerous.
Intel Core 2 Duo E6600 @ 3.0, ASUS P5N32-SLI E
896MB nVIDIA GeForce BFG 260GTX OC, 19"SONY SDM-HS95PR
4GB DDR2 800MHz
Can someone explain where i am going wrong or is there easier free software.
Thanks
James
Helmet Courtesy of Dangerous.
Intel Core 2 Duo E6600 @ 3.0, ASUS P5N32-SLI E
896MB nVIDIA GeForce BFG 260GTX OC, 19"SONY SDM-HS95PR
4GB DDR2 800MHz

Sorry, only registered users may post in this forum.
GP3 CarshapesGP3 CART & other CarsGP3 CART & other TracksGP3 CockpitsGP3 Editors / UtilitiesGP3 F1 CarsGP3 F1 TracksGP3 Fictional CarsGP3 Fictional TracksGP3 Graphics (Software Mode)GP3 HelmetsGP3 MiscGP3 Misc. GraphicsGP3 PatchesGP3 PitcrewsGP3 Season PackagesGP3 SetupsGP3 SoundsGP3 TeamartGP3 Trackgraphics
Maintainer: mortal, stephan | Design: stephan, Lo2k | Moderatoren: mortal, TomMK, Noog, stephan | Downloads: Lo2k | Supported by: Atlassian Experts Berlin | Forum Rules | Policy