New computer advice please *see page 6 now!*
Posted by bigears
| Registered: 20 years ago |
Sure then.
One more n00bish question, is the network card already included in the motherboard? Or do I need to remove it from my old computer and install it myself?
I use the Internet via an ethernet cable connected into my network card you see.")
-------------------------------------------------------------------------

Did your birth certificate come with an apology letter from Durex?
One more n00bish question, is the network card already included in the motherboard? Or do I need to remove it from my old computer and install it myself?
I use the Internet via an ethernet cable connected into my network card you see.
-------------------------------------------------------------------------
Did your birth certificate come with an apology letter from Durex?
| Registered: 20 years ago |
| Registered: 18 years ago |
Received my nice new 24" TFT today.
Have to say its a bargain at the price i got it for - i am more than pleased with it
[www.thisis-matt.co.uk]
I dont know if that information is any good in the pic as to what type i got sent?
Cheers,
Mika19b.
Have to say its a bargain at the price i got it for - i am more than pleased with it
[www.thisis-matt.co.uk]
I dont know if that information is any good in the pic as to what type i got sent?
Cheers,
Mika19b.
| Registered: 20 years ago |
And I quote
Press the M and + buttons on the monitor at the same time to get the panel model number. I'd guess its the AUO panel as their white purity is not as good as the Samsung one.
Apparently a more simple way of finding out is that the TN panels have a glossy screen and the PVA have the more normal matt screen, though I don't know if this is uniform.
I'm not a fan of glossy. They're fine in ideal light, but as soon as the light changes a little bit, the entire image is compromised. It's a particular nightmare on laptops.
| Registered: 20 years ago |
gav Wrote:
-------------------------------------------------------
>
> Apparently a more simple way of finding out is
> that the TN panels have a glossy screen and the
> PVA have the more normal matt screen, though I
> don't know if this is uniform.
>
It's not actually. Older TN panels are almost always matt surfaced, and there are also many new TN panel based monitors that have a matt screen. I think it was Samsung who started to put glossy screens first on their cheap desktop monitors, and some others followed.
I don't like the current trend of glossy screens either, for me having a screen with no disturbing reflections is one of the biggest pros of LCD monitors, and a glossy coating totally defeates that.

My photo gallery: [viltzu86.deviantart.com]
Edited 2 time(s). Last edit at 08/27/2008 08:55PM by villej.
-------------------------------------------------------
>
> Apparently a more simple way of finding out is
> that the TN panels have a glossy screen and the
> PVA have the more normal matt screen, though I
> don't know if this is uniform.
>
It's not actually. Older TN panels are almost always matt surfaced, and there are also many new TN panel based monitors that have a matt screen. I think it was Samsung who started to put glossy screens first on their cheap desktop monitors, and some others followed.
I don't like the current trend of glossy screens either, for me having a screen with no disturbing reflections is one of the biggest pros of LCD monitors, and a glossy coating totally defeates that.
My photo gallery: [viltzu86.deviantart.com]
Edited 2 time(s). Last edit at 08/27/2008 08:55PM by villej.
| Registered: 20 years ago |
villej Wrote:
-------------------------------------------------------
> It's not actually. Older TN panels are almost
> always matt surfaced, and there are also many new
> TN panel based monitors that have a matt screen. I
> think it was Samsung who started to put glossy
> screens first on their cheap desktop monitors, and
> some others followed.
>
> I don't like the current trend of glossy screens
> either, for me having a screen with no disturbing
> reflections is one of the biggest pros of LCD
> monitors, and a glossy coating totally defeates
> that.
Erm... on the DGM monitors... that we're talking about.")
Sorry. Didn't really make it clear enough.
-------------------------------------------------------
> It's not actually. Older TN panels are almost
> always matt surfaced, and there are also many new
> TN panel based monitors that have a matt screen. I
> think it was Samsung who started to put glossy
> screens first on their cheap desktop monitors, and
> some others followed.
>
> I don't like the current trend of glossy screens
> either, for me having a screen with no disturbing
> reflections is one of the biggest pros of LCD
> monitors, and a glossy coating totally defeates
> that.
Erm... on the DGM monitors... that we're talking about.
Sorry. Didn't really make it clear enough.
| Registered: 20 years ago |
Righto, the day is coming. Scan.co.uk have texted me that the computer is being delivered tomorrow.
Now I got a big task to do, installing the graphics card into my new computer, I never built anything in a computer before.
So I am wondering, will the computer work without the graphic card? So if I ever encounter a problem then I am wondering if I am still able to access to this thread and ask for advice?
If not then, tell me what to do with the graphics card installation. I know I need to follow the instructions booklet but is that it?
Do I need to install any drivers from the Net? And so on.
Cheers
-------------------------------------------------------------------------
Did your birth certificate come with an apology letter from Durex?
| Registered: 20 years ago |
Erm... hang on. You've just ordered the components, have you not? As in building it yourself?
The tab in the Excel spreadsheet says "Self-build AMD". The pre-built machine was on the "Dell Inspiron" tab, as I said.
You don't just have to install the graphics card. It's all the pieces in their component parts. They don't assemble it for you unless you order one of their machines.
//edit: as I stated on that post on the first page:
gav Wrote:
-------------------------------------------------------
> There are 3 options (in the sheet tabs along the
> bottom). One AMD-based self build, one Intel-based
> self build and one Dell pre-built which you'll
> have to add a graphics card to.
Edited 1 time(s). Last edit at 08/28/2008 12:24AM by gav.
| Registered: 20 years ago |


| Registered: 20 years ago |
Uh oh indeed. :P
I thought I saw in their email saying about a built PC somewhere.
Well, this will be fun and I could have a go building it by following the instructions or use my computer as a template. But I know a friend who I think that can help me out then.
-------------------------------------------------------------------------
Did your birth certificate come with an apology letter from Durex?
| Registered: 20 years ago |
Today at work I was perusing Amazon for some stuff and went through 3 listings they had for making our own PCs with a budget, like the best you could get for US$1,500 and 2 other users listed components and some steps to building our own nice gaming rig for around 1,000-1,250. What do you guys think, should I have a look at those?
| Registered: 20 years ago |
bigears Wrote:
-------------------------------------------------------
> Uh oh indeed. :P
>
> I thought I saw in their email saying about a
> built PC somewhere.
>
> Well, this will be fun and I could have a go
> building it by following the instructions or use
> my computer as a template. But I know a friend who
> I think that can help me out then.
This might not work out exactly right, (might have to install the hard drive and DVD drives before the PSU for example) but it'll give you an idea.
It's pretty simple mate, though things will be a bit different to the current PC, though it's much easier now than it used to be.
First thing to remember is to keep your head. It's very easy to speed ahead without really thinking or start panicking. Just think everything through, before you start, and then as you're doing it. Unpack everything if you've the space, and look at where everything may go.
Start by unpacking the motherboard. There's a manual for that which will be the only one you'll need. Have a read through the first 10-15 pages first, especially the CPU installation bit. You ought to be able to install the CPU (it'll only go into the socket 1 way), so make sure you get it right by just following the manual. I nearly broke one a few weeks back by not paying attention. Installed it the wrong way around and bent some pins. Had to use a miniature screwdriver to bend them back... :\
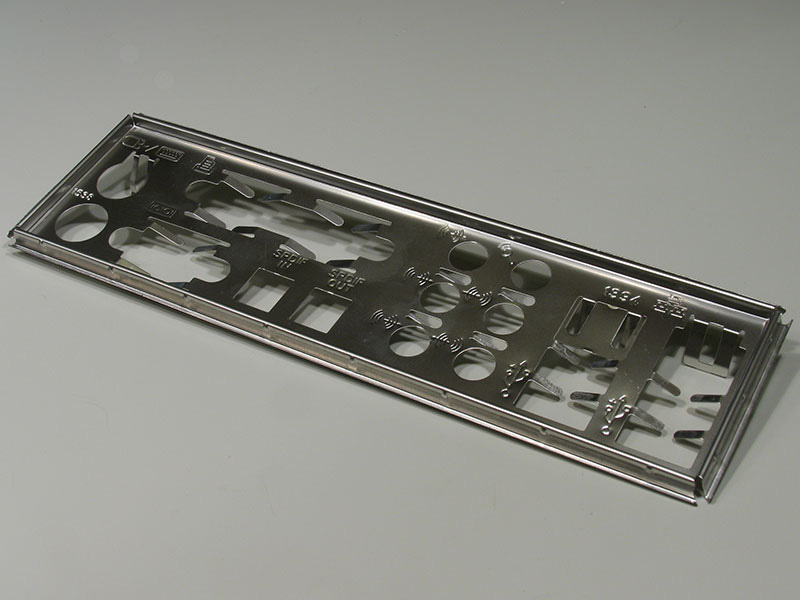
Now, put the motherboard to 1 side and unpack the case. With the motherboard there's an I/O shield which is a cut-out piece of metal which fits into the case. Chances are there's already one on the case, but it's not suited to the motherboard, so pop it out (just push it from the outside inwards) and place this one in it's place (make sure it's the right way around, and push it outwards from the inside of the case) until it has snapped into place on each of the 4 sides.
Now the case ought to have motherboard standoffs which are usually brass hexagonal screws. Place the motherboard loosely in the case, and make a mental note of where you'll need to place these standoffs. Screw them in and then tighten them completely with a pair of pliers.
I'll probably be easiest to actually install the motherboard now. Place it into the case again and line it up against that I/O shield. Slide it into place, trying not to scrape the underside of the motherboard off the standoffs. Twist the board a bit until the standoffs roughly line up with their holes. Using screws included with the case, screw in the 2 or 3 holes nearest the rear of the case, then do the rest.
Take the CPU cooler, included with the CPU. Check that the pre-applied thermal paste (well, pad) is on the underside of it and not covered by protective plastic or anything. Hook 1 side of the cooler onto one of the hooks on the plastic surround around the CPU (recommend the top hook first due to space restraints), then take the other one and push down over the other hook, which should keep it firmly in place.
Connect the CPU cooler fan to the CPU fan header on the motherboard (on the side of the rear ports - if the cable only has a 3-pin connector, that's not an issue - just plug it into the pins with the sticky-up-plastic bit (technical term) - it'll only go in 1 way.
Install both RAM modules into the 2 RAM sockets (they'll only go in 1 way - line up the pin in the middle). Push down on one side one at a time until it snaps into place, then the other side.
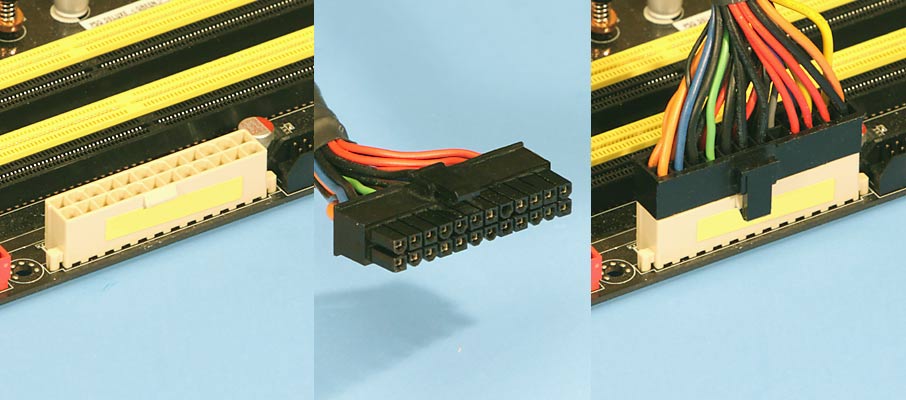
Next. PSU I guess. Screw it into the area for it at the top of the case. This bit is easy. Take the big 24-pin connector (it might be a 20+4pin clipped together) and connect it to the corresponding socket on the motherboard. It's only going to go in 1 way. There ought to be a 4-pin square connector separate to that (might be a 4+4pin one clipped together, in which case you'll probably have to unclip them). It goes on the top left of the motherboard, around the CPU socket, and again, only goes in 1 way.
Apparently there's 2 fans included with the case (I really can't remember anything!). Connect them both up to the PSU if they've got molex connectors (which I fully expect they have).
Screw in the hard drive and DVD drives. Connect a SATA power cable from the PSU into 1 of each. They'll only go in one way.
Now a potentially annoying bit. There'll be a set of cables coming from the front of the case to connect the power and reset buttons and power and hard drive LEDs to the motherboard. Chances are you'll not get this right first time, but I never do anyway, and it won't do any harm... it just won't work properly when you switch it on (no lights or no power). Check the motherboard manual - it has a more detailed diagram of what goes where (which they manage to make look as complicated as possible). It's on pages 25 (power LED) and 26 (the rest). As far as I remember, the little arrow on the black socket goes to the + (positive) side on the motherboard (check the motherboard manual). As I said though, it causes no damage if it doesn't work - it just doesn't work, so switch things off (at the mains) and try turning them around. If things don't switch on, this is probably why. Told you it was annoying. :P
Note the case probably doesn't have a speaker, so ignore that one. There's also 2 areas for power LED on the motherboard. If the power LED connector on the case is 3-pin (which I'm fairly sure this case has), use the separate one (page 25) and if it's a 2-pin one (never seen one personally), then use the one on the rest of the block on page 26.
It could also comes as a block connector (same shape as the USB connectors - though don't confuse them!), which would make things much easier, though I'm fairly sure mine didn't.
Speaking of the USB cables, connect them from the front of the case to the headers on the motherboard - it has 4 apparently, so just pick which ever you like.
You'll also have included with the motherboard a USB extension thingy that you can run from one of the other sockets to the rear of the case (where cards get installed) Connect it up if you like, but just leave it loose until you've installed the graphics card.
If the case has a firewire socket at the front, then the motherboard doesn't, so either disconnect the cable from the front of the case if you can, or just tie it up out of the way if you can't.
Next up you might as well connect the 2 SATA cables (included in the box) from the motherboard to the hard drive and DVD drive.
Finally, that I can think of, you'll have the graphics card to install. Take the covering plate off the back of the case and place the graphics card into the PCIe x16 slot (the longest one), letting it clip into place. There's a protective little clip at the end of the slot to give it a bit more support, so if you need to remove the graphics card at any point, pull this slightly outwards while lifting the card up. Screw the graphics card into place at the back of the case and also that USB extension if you bothered with it. Plug in the 6-pin connector from the PSU (there may be 2, in which case just use 1) to the one on the end of the graphics card.
Leave the case sides off for now (chances are you'll have to fiddle around with those LED and button connectors).
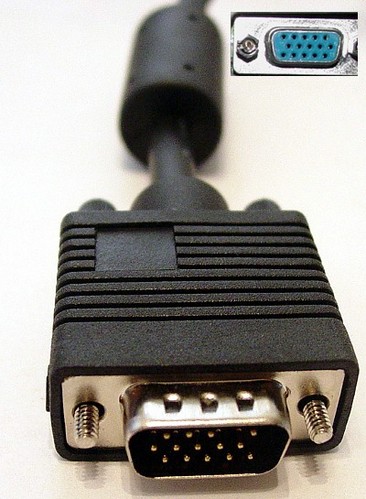
Hook up the necessary cables (keyboard, power and monitor). Use your old keyboard at the moment if possible, as the wireless keyboard and mice may be better off being set up later. If you monitor only has VGA and no DVI then we'll hope that Gainward included a DVI to VGA adapter or we're a bit stuck for now.
Switch it on, but don't look at the screen, look at the fans to make sure they'll all moving (especially the CPU and graphics cards ones). If they're not, switch it off immediately (the flick switch on the back of the PSU, or pull the power cable) and check the CPU fan is connected to the motherboard.
After everything is sorted, settle back, switch it on, go into the BIOS (normally by pressing the delete key (note; not the backspace one)). Go to the Standard CMOS Features page (it's in the motherboard manual). Change the time and date. Disable the floppy disk drive (it'll still show up drive A in Windows otherwise).
Go to the Advanced BIOS Features page. Change the CD/DVD drive to be the first boot device.
Stick your Windows XP SP3 disk in, exit the BIOS, saving the changes, and let it boot to the Windows setup screens. I'm HOPING it'll see the hard drive. If so, format the drive (not the quick option) and go through the Windows setup, taking the time to choose the language options and things.
If the Windows setup doesn't see the drive, post back and I'll rig something up for you.
If it's all too much, if you sort out and pay for carriage both ways, I don't mind you sending it all to me and I'll build it and install the basic drivers and programs for you. I'm on holiday for another week, so there'll be time, and I don't mind.
Edited 1 time(s). Last edit at 08/28/2008 02:36PM by gav.
-------------------------------------------------------
> Uh oh indeed. :P
>
> I thought I saw in their email saying about a
> built PC somewhere.
>
> Well, this will be fun and I could have a go
> building it by following the instructions or use
> my computer as a template. But I know a friend who
> I think that can help me out then.
This might not work out exactly right, (might have to install the hard drive and DVD drives before the PSU for example) but it'll give you an idea.
It's pretty simple mate, though things will be a bit different to the current PC, though it's much easier now than it used to be.
First thing to remember is to keep your head. It's very easy to speed ahead without really thinking or start panicking. Just think everything through, before you start, and then as you're doing it. Unpack everything if you've the space, and look at where everything may go.
Start by unpacking the motherboard. There's a manual for that which will be the only one you'll need. Have a read through the first 10-15 pages first, especially the CPU installation bit. You ought to be able to install the CPU (it'll only go into the socket 1 way), so make sure you get it right by just following the manual. I nearly broke one a few weeks back by not paying attention. Installed it the wrong way around and bent some pins. Had to use a miniature screwdriver to bend them back... :\
Now, put the motherboard to 1 side and unpack the case. With the motherboard there's an I/O shield which is a cut-out piece of metal which fits into the case. Chances are there's already one on the case, but it's not suited to the motherboard, so pop it out (just push it from the outside inwards) and place this one in it's place (make sure it's the right way around, and push it outwards from the inside of the case) until it has snapped into place on each of the 4 sides.
Now the case ought to have motherboard standoffs which are usually brass hexagonal screws. Place the motherboard loosely in the case, and make a mental note of where you'll need to place these standoffs. Screw them in and then tighten them completely with a pair of pliers.
I'll probably be easiest to actually install the motherboard now. Place it into the case again and line it up against that I/O shield. Slide it into place, trying not to scrape the underside of the motherboard off the standoffs. Twist the board a bit until the standoffs roughly line up with their holes. Using screws included with the case, screw in the 2 or 3 holes nearest the rear of the case, then do the rest.
Take the CPU cooler, included with the CPU. Check that the pre-applied thermal paste (well, pad) is on the underside of it and not covered by protective plastic or anything. Hook 1 side of the cooler onto one of the hooks on the plastic surround around the CPU (recommend the top hook first due to space restraints), then take the other one and push down over the other hook, which should keep it firmly in place.
Connect the CPU cooler fan to the CPU fan header on the motherboard (on the side of the rear ports - if the cable only has a 3-pin connector, that's not an issue - just plug it into the pins with the sticky-up-plastic bit (technical term) - it'll only go in 1 way.
Install both RAM modules into the 2 RAM sockets (they'll only go in 1 way - line up the pin in the middle). Push down on one side one at a time until it snaps into place, then the other side.
Next. PSU I guess. Screw it into the area for it at the top of the case. This bit is easy. Take the big 24-pin connector (it might be a 20+4pin clipped together) and connect it to the corresponding socket on the motherboard. It's only going to go in 1 way. There ought to be a 4-pin square connector separate to that (might be a 4+4pin one clipped together, in which case you'll probably have to unclip them). It goes on the top left of the motherboard, around the CPU socket, and again, only goes in 1 way.
Apparently there's 2 fans included with the case (I really can't remember anything!). Connect them both up to the PSU if they've got molex connectors (which I fully expect they have).
Screw in the hard drive and DVD drives. Connect a SATA power cable from the PSU into 1 of each. They'll only go in one way.
Now a potentially annoying bit. There'll be a set of cables coming from the front of the case to connect the power and reset buttons and power and hard drive LEDs to the motherboard. Chances are you'll not get this right first time, but I never do anyway, and it won't do any harm... it just won't work properly when you switch it on (no lights or no power). Check the motherboard manual - it has a more detailed diagram of what goes where (which they manage to make look as complicated as possible). It's on pages 25 (power LED) and 26 (the rest). As far as I remember, the little arrow on the black socket goes to the + (positive) side on the motherboard (check the motherboard manual). As I said though, it causes no damage if it doesn't work - it just doesn't work, so switch things off (at the mains) and try turning them around. If things don't switch on, this is probably why. Told you it was annoying. :P
Note the case probably doesn't have a speaker, so ignore that one. There's also 2 areas for power LED on the motherboard. If the power LED connector on the case is 3-pin (which I'm fairly sure this case has), use the separate one (page 25) and if it's a 2-pin one (never seen one personally), then use the one on the rest of the block on page 26.
It could also comes as a block connector (same shape as the USB connectors - though don't confuse them!), which would make things much easier, though I'm fairly sure mine didn't.
Speaking of the USB cables, connect them from the front of the case to the headers on the motherboard - it has 4 apparently, so just pick which ever you like.
You'll also have included with the motherboard a USB extension thingy that you can run from one of the other sockets to the rear of the case (where cards get installed) Connect it up if you like, but just leave it loose until you've installed the graphics card.
If the case has a firewire socket at the front, then the motherboard doesn't, so either disconnect the cable from the front of the case if you can, or just tie it up out of the way if you can't.
Next up you might as well connect the 2 SATA cables (included in the box) from the motherboard to the hard drive and DVD drive.
Finally, that I can think of, you'll have the graphics card to install. Take the covering plate off the back of the case and place the graphics card into the PCIe x16 slot (the longest one), letting it clip into place. There's a protective little clip at the end of the slot to give it a bit more support, so if you need to remove the graphics card at any point, pull this slightly outwards while lifting the card up. Screw the graphics card into place at the back of the case and also that USB extension if you bothered with it. Plug in the 6-pin connector from the PSU (there may be 2, in which case just use 1) to the one on the end of the graphics card.
Leave the case sides off for now (chances are you'll have to fiddle around with those LED and button connectors).
Hook up the necessary cables (keyboard, power and monitor). Use your old keyboard at the moment if possible, as the wireless keyboard and mice may be better off being set up later. If you monitor only has VGA and no DVI then we'll hope that Gainward included a DVI to VGA adapter or we're a bit stuck for now.
Switch it on, but don't look at the screen, look at the fans to make sure they'll all moving (especially the CPU and graphics cards ones). If they're not, switch it off immediately (the flick switch on the back of the PSU, or pull the power cable) and check the CPU fan is connected to the motherboard.
After everything is sorted, settle back, switch it on, go into the BIOS (normally by pressing the delete key (note; not the backspace one)). Go to the Standard CMOS Features page (it's in the motherboard manual). Change the time and date. Disable the floppy disk drive (it'll still show up drive A in Windows otherwise).
Go to the Advanced BIOS Features page. Change the CD/DVD drive to be the first boot device.
Stick your Windows XP SP3 disk in, exit the BIOS, saving the changes, and let it boot to the Windows setup screens. I'm HOPING it'll see the hard drive. If so, format the drive (not the quick option) and go through the Windows setup, taking the time to choose the language options and things.
If the Windows setup doesn't see the drive, post back and I'll rig something up for you.
If it's all too much, if you sort out and pay for carriage both ways, I don't mind you sending it all to me and I'll build it and install the basic drivers and programs for you. I'm on holiday for another week, so there'll be time, and I don't mind.
Edited 1 time(s). Last edit at 08/28/2008 02:36PM by gav.
| Registered: 20 years ago |
Gui: [forums.overclockers.co.uk].
UK-based forum with some examples updated frequently and with variations of budget. It'll be a hell of a lot better than some Amazon seller trying to make an easy few quid. You'll have to convert the monies into Dollars or Real depending on where you're buying from, but I'm sure they'll all be readily available, especially in the States. If you're not sure, post and we'll see.
Just one thing. I can't stand his choice of cases personally. :P
| Registered: 16 years ago |
gav Wrote:
> You ought to be able to install the CPU (it'll only go
> into the socket 1 way), so make sure you get it
> right by just following the manual. I nearly broke
> one a few weeks back by not paying attention.
> Installed it the wrong way around and bent some
> pins. Had to use a miniature screwdriver to bend
> them back... :\
Jammy F***! Never happened to me luckily, but it's always been the worst part for me")
Also, ive always thought its best to have the PSU in first and plugged into the mains, with the mains off as this acts as an earth to the case and the components that its connected to?

> You ought to be able to install the CPU (it'll only go
> into the socket 1 way), so make sure you get it
> right by just following the manual. I nearly broke
> one a few weeks back by not paying attention.
> Installed it the wrong way around and bent some
> pins. Had to use a miniature screwdriver to bend
> them back... :\
Jammy F***! Never happened to me luckily, but it's always been the worst part for me
Also, ive always thought its best to have the PSU in first and plugged into the mains, with the mains off as this acts as an earth to the case and the components that its connected to?
| Registered: 20 years ago |
It does, but that's kinda dependant on having it plugged into the motherboard during all the assembly, which isn't at all practical or even possible, especially is this is a MicroATX case.
It also makes it' nearly impossible to install the motherboard in the case if you install the PSU first.
I've never broken anything with static, so while it's not particularly good advice, it's going to take some bad luck to have problems because of it.
It also makes it' nearly impossible to install the motherboard in the case if you install the PSU first.
I've never broken anything with static, so while it's not particularly good advice, it's going to take some bad luck to have problems because of it.
| Registered: 16 years ago |
| Registered: 20 years ago |
| Registered: 20 years ago |
")
| Moderator Registered: 20 years ago |
Gav, how have you never seen a 2 pinn'ed power led!!!!!!!!!!!!!!!!! They are seriously everywhere :|, And wouldnt it be preferable to connect the case fans to the motherboard rather than straight to molex, just to cinfused things even more for bigears :$
Anyway, fantastic guide gav, im sure itll help big ears alot, literally just caught up on this thread, one think id mention was how could you not reccomend the Coolermaster Elite 330 case, its awesome, and increadible for the price , still for future reference .
Let us know how you get on bigears, good luck
__________________________

Help keep our forums tidy.
Use the search function...
Edited 1 time(s). Last edit at 08/30/2008 12:14AM by Willb.
Anyway, fantastic guide gav, im sure itll help big ears alot
, literally just caught up on this thread, one think id mention was how could you not reccomend the Coolermaster Elite 330 case, its awesome, and increadible for the price , still for future reference .Let us know how you get on bigears, good luck
__________________________
Help keep our forums tidy.
Use the search function...
Edited 1 time(s). Last edit at 08/30/2008 12:14AM by Willb.
| Registered: 20 years ago |
The fans come with a molex connector, not a standard fan connector, as I remember. Most OEM motherboards don't offer fan connectors beyond the CPU one, so cases tend to follow that trend. He's using no molex connectors for anything else, so rather than confuse him with additional adaptors, using the molex cables used are the best bet.
I've built enough cases in my time, and none of the power LED cables between the case and motherboard have had a 2-pin connector, perhaps other than the single ASUS case where IIRC I had to fudge an old reset cable to be the power LED cable. Reset and power switches, and the HDD LED have always had 2-pin connectors, but the standard until the year before last was 3-pin for the power LED. That standard is now (very) slowly changing to the block connectors for all of the switches and LEDs, with just the speaker header remaining separate.
I've built enough cases in my time, and none of the power LED cables between the case and motherboard have had a 2-pin connector, perhaps other than the single ASUS case where IIRC I had to fudge an old reset cable to be the power LED cable. Reset and power switches, and the HDD LED have always had 2-pin connectors, but the standard until the year before last was 3-pin for the power LED. That standard is now (very) slowly changing to the block connectors for all of the switches and LEDs, with just the speaker header remaining separate.


Sorry, only registered users may post in this forum.
GP3 CarshapesGP3 CART & other CarsGP3 CART & other TracksGP3 CockpitsGP3 Editors / UtilitiesGP3 F1 CarsGP3 F1 TracksGP3 Fictional CarsGP3 Fictional TracksGP3 Graphics (Software Mode)GP3 HelmetsGP3 MiscGP3 Misc. GraphicsGP3 PatchesGP3 PitcrewsGP3 Season PackagesGP3 SetupsGP3 SoundsGP3 TeamartGP3 Trackgraphics
Maintainer: mortal, stephan | Design: stephan, Lo2k | Moderatoren: mortal, TomMK, Noog, stephan | Downloads: Lo2k | Supported by: Atlassian Experts Berlin | Forum Rules | Policy