First steps into painting own Cars
Posted by Losi
| Registered: 17 years ago |
Hello everyone ")
I am playing GP4 now for so many years and also being a silent participant in this Forum, I now want to take a minute to get some possible answers for a question, that has become relevant to me within the last 24 hours or something. :D
I love all the creativity that so many people use here to provide us with the latest Cars, fantasy Cars, Tracks, Helmets, Graphics and whatsoever. But... as I am a person who likes his GP4 pretty individual, as I am only playing fictional seasons with my own characters, teams etc. I've started to paint my very first Cars the last day and need some input for this Job. As I am all new to painting anything on a PC, is ist useful for me to just go ahead and do some learning by doing in the first steps (with more or less decent results) or should I stick to some of the detailed Video Tutorials that are available on Youtube for example? What were your first steps into painting Cars, or were all the Guys around here doing Paintings and Modelling all before joining the GP4 Community?
I do not really know how to get started in the painting business, as my Cars look very below average and my Models in Gimp a are Layer-Chaos.. :D
I know this is a pretty basic question, but maybe some advice or knowledge from experienced painters could help me get a foot (or at least a toe) in to the door of painting my own Cars.
Thanks to everyone who mind sharing his thoughts on this.
Cheers
Losi
| Registered: 11 years ago |


| Registered: 17 years ago |
The easy way to start is to use Zmodeler.
Q: Why?
A: You can import your model, export the wireframe to make your template.
Tools required: Zmodeler 1.07b + filters & plugins:
Download link: [www.mediafire.com]
Install zmodeler first (if you have not done it, yet). Then, replace the filters & plugins to their respective folders into your installation folder.
Q: How to export the wireframe for each texture?
A: Considering that all the objects of your 3D model are already mapped correctly, imort your 3d model into modeler.
Then, follow these instructions:
1- With the rectangle easy selector tool (on the Menu bar on the top of Zmodeler window), Select all the car (it becomes red)
2- Click on the faces button ( or press 3 on your keyboard). Choose, Select/None and click right into the window to deselect the faces.
3- Click on Select/ by material and choose the texture you want to paint. (faces related to the texture mapping become red).
4- Click on Surface/ Mapping/ Assign UV and click left on one of the red faces (important: SEL must be activated )
5- Once done, Select/ None and click right into the window. Click on the object button (or press 4) and click right into the window once more to deselect the object
6- Change the main window view to "UV Mapper" You will see the wireframe applied on the texture (verify that all your objects mapped are into the square/ inside the texture)
7- Click on Texture/ UVexport and click left once on your UV Mapping.
8- Then, on the menu, click on File / export choose EPS format, give a name to your file and save, choose into the list UVMapperData[0]
It is done. Now you can use Photoshop or whatever the program you like. Import the EPS file (choose the same dimensions than your layer. Example 2048x2048 if your texture is in 2048x2048 etc...).
You can do it for each texture of your 3D model.
However, I don't know what program you are using to paint. I am just using Photoshop and I am not familiar with the Gimp. But I guess that the tools are similar.
I made a video tutorial for someone last year but it is in french. But I think that with the instructions above and the video, you will understand how to do:
Link to video tutorial: [www.mediafire.com]
")
____________________________________________________________________________________________________________________________________________


Edited 1 time(s). Last edit at 02/26/2015 04:32AM by Excalibur.
Q: Why?
A: You can import your model, export the wireframe to make your template.
Tools required: Zmodeler 1.07b + filters & plugins:
Download link: [www.mediafire.com]
Install zmodeler first (if you have not done it, yet). Then, replace the filters & plugins to their respective folders into your installation folder.
Q: How to export the wireframe for each texture?
A: Considering that all the objects of your 3D model are already mapped correctly, imort your 3d model into modeler.
Then, follow these instructions:
1- With the rectangle easy selector tool (on the Menu bar on the top of Zmodeler window), Select all the car (it becomes red)
2- Click on the faces button ( or press 3 on your keyboard). Choose, Select/None and click right into the window to deselect the faces.
3- Click on Select/ by material and choose the texture you want to paint. (faces related to the texture mapping become red).
4- Click on Surface/ Mapping/ Assign UV and click left on one of the red faces (important: SEL must be activated )
5- Once done, Select/ None and click right into the window. Click on the object button (or press 4) and click right into the window once more to deselect the object
6- Change the main window view to "UV Mapper" You will see the wireframe applied on the texture (verify that all your objects mapped are into the square/ inside the texture)
7- Click on Texture/ UVexport and click left once on your UV Mapping.
8- Then, on the menu, click on File / export choose EPS format, give a name to your file and save, choose into the list UVMapperData[0]
It is done. Now you can use Photoshop or whatever the program you like. Import the EPS file (choose the same dimensions than your layer. Example 2048x2048 if your texture is in 2048x2048 etc...).
You can do it for each texture of your 3D model.
However, I don't know what program you are using to paint. I am just using Photoshop and I am not familiar with the Gimp. But I guess that the tools are similar.
I made a video tutorial for someone last year but it is in french. But I think that with the instructions above and the video, you will understand how to do:
Link to video tutorial: [www.mediafire.com]
____________________________________________________________________________________________________________________________________________
Edited 1 time(s). Last edit at 02/26/2015 04:32AM by Excalibur.
| Registered: 17 years ago |
Thanks to you two so far. I have used the Tutorial by Sonnercteer, which is pretty awesome to get a first clue on what tools to use and how to look up the model and bring it into the game.
I've attached my first Car, that I've done for the last 48 hours. The Design is OK for me, as I am only using it, but my problems are first the Sponsor Logos, as I think they do not really get in touch with the Car Painting, and do not look as a unit, but just glued on the car. And most of all, the lines are driving me crazy. The white line that goes all the way to the front is supposed to be somewhat like the new McLaren with the red/orange line that goes all the way to the nose and back. But it looks just amateurish as I just painted it on with the pencil tool in Gimp. Are these just some typical beginners issues or am I just using the wrong tools, filters etc. when painting the Car??
I've attached my first Car, that I've done for the last 48 hours. The Design is OK for me, as I am only using it, but my problems are first the Sponsor Logos, as I think they do not really get in touch with the Car Painting, and do not look as a unit, but just glued on the car. And most of all, the lines are driving me crazy. The white line that goes all the way to the front is supposed to be somewhat like the new McLaren with the red/orange line that goes all the way to the nose and back. But it looks just amateurish as I just painted it on with the pencil tool in Gimp. Are these just some typical beginners issues or am I just using the wrong tools, filters etc. when painting the Car??
| Registered: 17 years ago |
Nice start. The logos look good to me but it is hard to see on this image. For the logos, prefer to use .eps ones, I mean without background so it matches correctly with the background texture...
The important thing to know is that your car will look better in game with a good alpha layer, too. You can use the alpha of the original car, if you don't know how to do it. I will make a tutorial soon for alphas and ambient occlusion (shadows) when I will get time...
About the lines, sometimes, the mapping isn't very good to make lines because it is flat. So, depending of your original mapping, you can't design straight lines or nice curves and the result into 3D looks weird, sometimes. The thing to do is to remap the objects (or the faces of an object). It means to reset the mapping of the selected object or faces, to choose the good view (top or side) and to assign the new mapping to the texture. But it is another tutorial to do...
To paint correctly on 2 different objects which are juxtaposed, their mapping must be proportional and the faces flat or you will get weird things. This is probably your problem. I don't know this car but I suppose that the problem is the original mapping....
____________________________________________________________________________________________________________________________________________
Edited 1 time(s). Last edit at 02/26/2015 08:38PM by Excalibur.
| Registered: 14 years ago |
Well, mappings (and especially remapping) are far off from a beginner's guide. Since your question was, Losi, if you're using the wrong tools, the answer is yes Avoid painting with the pencil tool for straight lines. In this case, I would suggest you have a look into the path tool or the free range tool (or whatever it's called in English, I only have a German setup at hand right now). I also suggest you read up in your favorite search engine how to work with auto margins. Those tools in addition to the normal pencil and the fill tool are what a beginner gets best results with, in my opinion.

GPGSL : Team Owner of 'Maverick Track Performance' (MTP)
Avoid painting with the pencil tool for straight lines. In this case, I would suggest you have a look into the path tool or the free range tool (or whatever it's called in English, I only have a German setup at hand right now). I also suggest you read up in your favorite search engine how to work with auto margins. Those tools in addition to the normal pencil and the fill tool are what a beginner gets best results with, in my opinion.GPGSL : Team Owner of 'Maverick Track Performance' (MTP)
| Registered: 17 years ago |
I've read a few things about the Path-Tool today and might give it try once I am finished checking out the basics for it. What exactly is the difference between the Path-Tool, and for example holding Shift while drawing a line with Pencil? That's what I tried out in the past few hours, but still not getting best results.
Free Range Tool should be "Freie Auswahl"? Mein Setup ist auch nur Deutsch..
Free Range Tool should be "Freie Auswahl"? Mein Setup ist auch nur Deutsch..
| Registered: 17 years ago |
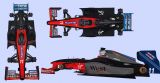
As only practives makes you better, I've tried a few things with Vector Logos and used the Path Tool to get the Style and Design of the Car more smooth looking.
I've attached another Car, but need some more help. The Martini Stripes on top of the engine cover (above the Monster Enegery Logo) have been taken from a Vector Logo and stretched on that Wing to fit in. But I cannot seem to get it curved so it fits the correct shape of the Wing. Is it possible to use some kind of Filter for this Logo to not be straight, but be curved? Or do I "have to" create the stripes myself and make them curvy via the Path Tool? It might just not look as genuine as the original logo..
Cheers
Losi
| Registered: 17 years ago |
Cheers Guys,
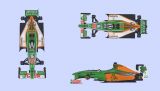
I just kept trying to paint my own cars and currently I am driving my own custom season with 11 self-painted Cars (some of them based on their reallife-model, other ones are fictional). The one that took the longest to create is a fictional Sauber Ford. It was a pain to create the chess patterns on the side.


You can also see the Williams BMW in blue and white, a Toro Rosso Ferrari in dark blue and red as well as the not yet finished Benetton Ford in green and white. The more time I invest in painting cars the more fun it gets, as it's great to have a championship with all self-painted cars. Cheers to MDBSnake, who gave starters a good Car Template to work on!!")
I just kept trying to paint my own cars and currently I am driving my own custom season with 11 self-painted Cars (some of them based on their reallife-model, other ones are fictional). The one that took the longest to create is a fictional Sauber Ford. It was a pain to create the chess patterns on the side.
You can also see the Williams BMW in blue and white, a Toro Rosso Ferrari in dark blue and red as well as the not yet finished Benetton Ford in green and white. The more time I invest in painting cars the more fun it gets, as it's great to have a championship with all self-painted cars. Cheers to MDBSnake, who gave starters a good Car Template to work on!!
| Registered: 11 years ago |
| Registered: 14 years ago |
| Registered: 15 years ago |
If you can get your hands on Photoshop start getting used to the pen tool, because that's the best for sharp, curved shapes. Try and work with the curves of the car you're working on.
When coming up with your own paint schemes, try not to do too much. As a rule of thumb, stick to using no more than three colours.
It's just a case of practice, really. Keep going and you'll get there.
GPGSL: S6 - TafuroGP Tester (14th) /// S7 - ART Tester (6th) /// S8 - Demon Driver (13th) /// S9 - Demon/Snake Driver (13th) /// S10 - Snake Driver (???) ///]
"My ambition is handicapped by laziness" - Charles Bukowski
Sorry, only registered users may post in this forum.
GP3 CarshapesGP3 CART & other CarsGP3 CART & other TracksGP3 CockpitsGP3 Editors / UtilitiesGP3 F1 CarsGP3 F1 TracksGP3 Fictional CarsGP3 Fictional TracksGP3 Graphics (Software Mode)GP3 HelmetsGP3 MiscGP3 Misc. GraphicsGP3 PatchesGP3 PitcrewsGP3 Season PackagesGP3 SetupsGP3 SoundsGP3 TeamartGP3 Trackgraphics
Maintainer: mortal, stephan | Design: stephan, Lo2k | Moderatoren: mortal, TomMK, Noog, stephan | Downloads: Lo2k | Supported by: Atlassian Experts Berlin | Forum Rules | Policy